
|  |
 |
Compaq & HP Notebook Optical Drive Installation Guide |
 |
Optical Drive (CD-ROM, CD-RW, DVD-ROM, DVD-RW) nstallation Guide for:
Compaq Evo Notebook N1050v, N1010v
Compaq Presario 1100, 2100, 2500
HP Pavilion ze4100, ze4200, ze4300, ze4400, ze4500, ze4600, ze4700, ze5200, ze5300, ze5400, ze5500, ze5600
HP nx9000, nx9005, nx9008, nx9010
1. Removing the Keyboard Cover
Required Equipment : #1 Phillips screwdriver & Small flat-blade screwdriver.
1. Unplug the AC adapter, if present, and then remove the battery.

2. Remove the two M2.5?.0 mm hinge cover screws that secure the keyboard cover to the rear of the notebook.
3. Carefully insert a flat-blade screwdriver blade under the keyboard cover near the right end, then near the c enter, then near the left end, and then gently lift up the center of the cover. Gently pry up the hinge covers if needed, being careful not to damage the plastics or wireless antenna underneath.
Caution : Be careful not to damage the antenna PCA that is connected to the left and right display assembly hinges. Damaging either antenna PCA can degrade notebook performance.
4. If necessary, while holding the center of the cover, carefully insert the flat-blade screwdriver under the right side of the display assembly hinge, gently pry up, and then lift the cover out. This procedure might need to be repeated on the left side of display assembly hinge to completely remove the cover.
2. Removing the Keyboard
After removing the keyboard cover , you can:
1. Remove the four M2.5?.0 mm screws that secure the keyboard to the top case.

2. Lift up on the keyboard at the switchboard PCA end and then pull it toward the display assembly to release the tabs from the top case.
3. Turn the keyboard over and disconnect the motherboard cable.
4. Remove the keyboard.
Caution : Do not excessively bend or fold the keyboard cable. Excessive flexing can damage the keyboard cable connectors.
Lay the keyboard face down on the top case, forward of its normal position, then reconnect the keyboard cable.
Slide the metal tabs on the bottom of the keyboard into their slots in the top case, then lower the keyboard into place.
3. Removing the Optical Drive
After removing the keyboard, now you are able to remove the optical drive installed in the computer.
(Following section applies only to HP Pavilion 4300, 4200, and 4100, HP nx9005 and nx9000, Compaq Evo Notebook N1050 and N1010, and Compaq Presario 2100 and 1100 models.)
1. Remove the two screws that secure the CD/DVD drive to the top case and motherboard.
Note : The screws that secure the CD/DVD drive are two different sizes. The front screw is a M2.5?.0 mm screw. The back screw is a M2.5?.0 mm screw. Make sure these screws are installed in the correct locations when reinstalling the CD/DVD drive. 4. 5.
2. Place your index finger in the top case opening and push out on the CD/DVD drive to release it from the motherboard.
3. Remove the CD/DVD drive.
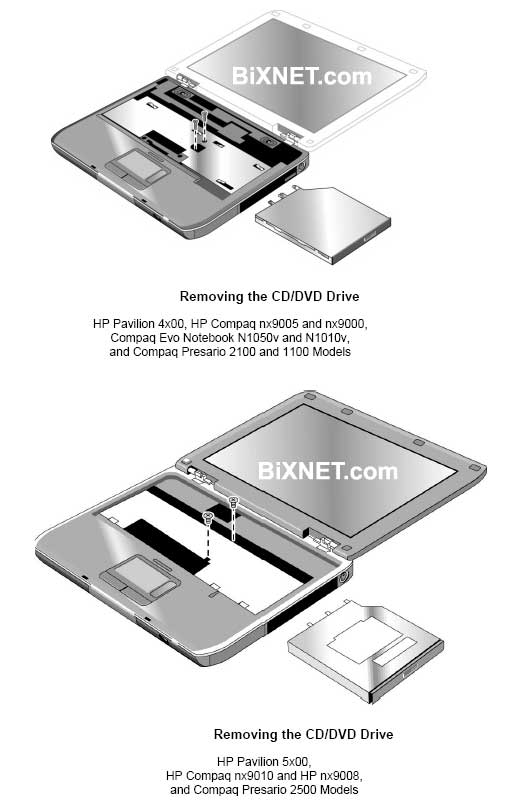
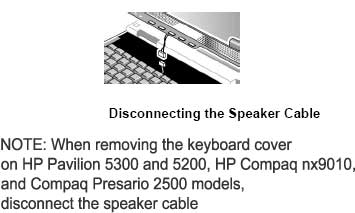
Following section applies only to HP Pavilion 5300 and 5200, HP nx9010, and Compaq Presario 2500 models.
1. Remove the two M2.5?.0 mm screws that secure the CD/DVD drive to the top case and motherboard.
2. Place your index finger in the top case opening and push out on the CD/DVD drive to release it from the motherboard.
3. Remove the CD/DVD drive.
Reverse the above procedure to install the new optical drive.
|


